

Monitoring searches that don’t return any results is an important part of improving any search experience. So-called “zero result searches” give you valuable data about what your customers are looking for but aren’t finding, giving you important clues about what products or services you should add.
In addition, zero result searches can give you useful information about how your customers are misspelling search terms, or using words that aren’t in your search engine, which you can then add to your search engine if appropriate.
One way to monitor zero result searches is to simply log them to your database every time they happen, with the exact query the user typed in and the date it occurred. Then, you can periodically aggregate this information by day and truncate the logging table so it doesn’t grow overly big. This approach is simple and works well for low-traffic sites, but isn’t a great idea for sites with lots of visitors, since it may cause a lot of work for your production database.
Another simple approach uses a third-party service called Loggly that provides a free subscription for simple uses like this.
Loggly is a general logging service that can be used with almost all modern web frameworks. I’ll be showing how to set it up using Ruby on Rails, but the same approach also applies to other languages and frameworks.
The first step is to sign up for a free account at Loggly. Then, add the Loggly gem to your Gemfile:
gem 'logglier'
and run “bundle install” to install it.
Next, create an initializer at config/initializers/loggly.rb containing:
loggly = Logglier.new('https://logs-01.loggly.com/inputs/[token]/tag/rails', threaded: true, format: :json)

Rails.logger.extend(ActiveSupport::Logger.broadcast(loggly))
Where [token] is the customer token you can find by clicking on “Source Setup” and then “Customer Tokens” in your Loggly account.
This initializer extends the native Rails logging object so that it also sends data to Loggly.
Then, wherever you call your search engine in your application, add a line like this:
logger.info event: "search", query: params[:query], num_results: @search_results.size, environment: Rails.env
Here, “params[:query]” is the query passed in by the user. @search_results is the variable containing the results from the search engine, so @search_results.size gives the total number of results. And I include the environment so that I can distinguish between tests in the development environment and real production traffic.
Then login to your Loggly account and click the “Search” tab. In the Field Explorer on the left, you should see a list similar to this:

Click “JSON” and then “num_results”. That will open a panel that looks like this:
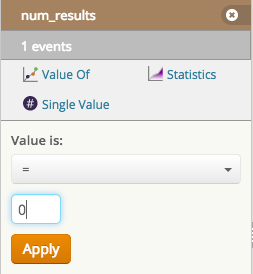
Enter “0” in the field shown and click “Apply”. This will show you a list of all the log entries that have zero search results. To display a more readable view of the data, click the Grid View icon:

Then click the orange “Add field column to grid” button, select “json.query” and voila! You now have a list of all the searches that returned zero results, which you can download by clicking the “Export grid events” icon on the right.
You can even click the “Trends View” icon (next to the Grid View icon) to see pie charts and line charts of the data (just select “Split by: json.query”). Once you’re done testing and have pushed your code to production, you can add an “environment: production” filter (in the same list of JSON parameters you used above) to only show production traffic.
Monitoring your site’s zero result searches is an excellent way to continually improve your site’s search experience. Whether you write the queries to a database or integrate with a third-party service like Loggly, you’ll gain valuable insight about your users’ behavior.